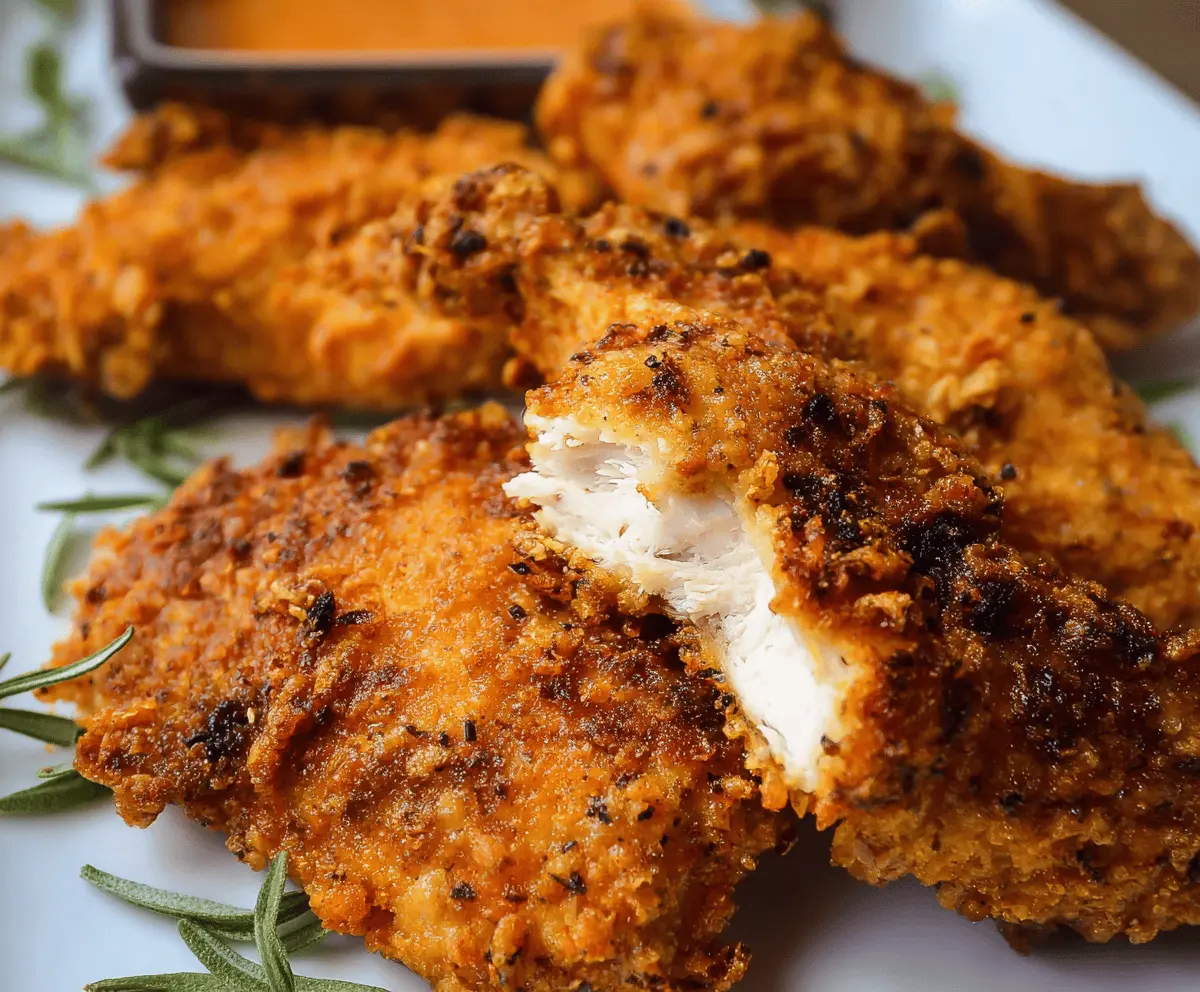
This Truly Crispy Oven Fried Chicken is a game changer! With a crunchy coating and juicy chicken inside, it feels like a treat without the guilt of frying.
You won’t miss the fryer when you taste this! I love how easy it is to whip up, plus it bakes up nice and crispy in no time. Perfect for family dinners or game day! 🍗
Key Ingredients & Substitutions
Chicken: I prefer boneless, skinless thighs for their juiciness, but breasts work just fine. For a different texture, you can use drumsticks or wings too – just adjust cooking time.
Buttermilk: This helps tenderize the chicken. If you don’t have buttermilk, mix 2 cups of milk with 2 tablespoons of vinegar or lemon juice and let it sit for 5-10 minutes.
Panko Breadcrumbs: These give that great crunch! If you don’t have panko, regular breadcrumbs can work, though they won’t be as crispy. Try crushing some crackers as a fun alternative!
Spices: The smoked paprika adds a nice flavor. If you want some extra kick, you can also add more cayenne or use a hot sauce in the buttermilk for a zesty twist!
How Do I Get My Oven-Fried Chicken Extra Crispy?
The secret to that perfect crunch lies in the coating and cooking method. The combination of panko and all-purpose flour provides a textural contrast that leads to an enjoyable crunch.
- Ensure the chicken is well-coated: After marinating, let excess buttermilk drip off before dredging in the flour-panko mix. This ensures the coating clings well.
- Use a wire rack: This allows air to circulate around the chicken, preventing sogginess. If you don’t have one, flip the chicken halfway through cooking if it’s sitting on the baking sheet.
- Spray with cooking spray: A light spray of oil on top of the coated chicken helps achieve that golden color while baking, making it crispier.
If you follow these tips, you’re guaranteed a tasty, crispy chicken that everyone will love!

Truly Crispy Oven Fried Chicken
Ingredients:
- 4 boneless, skinless chicken breasts (or 8 chicken thighs)
- 2 cups buttermilk
- 2 cups all-purpose flour
- 1 ½ cups panko bread crumbs
- 1 teaspoon garlic powder
- 1 teaspoon onion powder
- 1 teaspoon smoked paprika
- 1 teaspoon salt
- 1 teaspoon black pepper
- 1 teaspoon cayenne pepper (optional for heat)
- 2 large eggs
- Cooking spray (or oil for drizzling)
- Fresh rosemary or herbs for garnish (optional)
Time Needed:
This recipe takes about 15 minutes to prepare and about 30 minutes to bake. If you marinate the chicken overnight, it will enhance the flavor and tenderness. So, you can easily plan ahead!
Instructions:
1. Marinate the Chicken:
In a large bowl, pour in the buttermilk. Add the chicken pieces and let them soak for at least one hour—overnight in the fridge is even better! This makes the chicken juicy and flavorful.
2. Prepare the Coating:
In a shallow dish, mix together the flour, panko breadcrumbs, garlic powder, onion powder, smoked paprika, salt, black pepper, and cayenne pepper if you want a little heat. Stir well so everything is nicely blended.
3. Beat the Eggs:
In another bowl, crack the eggs and beat them together until they’re smooth. This will help the coating stick to the chicken.
4. Preheat Oven and Prepare Baking Surface:
Preheat your oven to 425°F (220°C). Line a baking sheet with foil for easy cleanup and place a wire rack on top. Lightly spray the rack with cooking spray to prevent sticking. This will help the chicken get crispy all around!
5. Coat the Chicken:
Take one piece of chicken out of the buttermilk, letting any excess drip off. First, dip it in the beaten eggs, then dredge it in the flour-panko mixture, pressing lightly so that it sticks well. Repeat for all chicken pieces.
6. Arrange on Rack:
Place the coated chicken pieces on the wire rack with space in between each piece. For that extra crispy finish, lightly spray the tops of the chicken with cooking spray or drizzle a little oil over them.
7. Bake:
Put the chicken in the oven and bake for about 25-30 minutes. You’ll want them to be golden brown and crispy, and check the internal temperature with a meat thermometer to make sure it reaches 165°F (74°C). Flip the chicken halfway through the cooking time and spray again if you like.
8. Rest the Chicken:
Once baked, take the chicken out of the oven and let it rest for about 5 minutes. This helps keep the juices inside, making each bite even tastier!
9. Serve:
Garnish with fresh rosemary or your favorite herbs if you like. Serve hot with your preferred dipping sauces or side dishes, and enjoy your delicious, crispy chicken!
Get ready to impress your family and friends with this crunchy, juicy, and oh-so-satisfying oven-fried chicken!
Can I Use Different Cuts of Chicken for This Recipe?
Absolutely! You can use thighs, drumsticks, or even wings. Just be aware that cooking times may vary—wings will cook faster, while larger pieces like drumsticks may need a few extra minutes. Always check for an internal temperature of 165°F (74°C).
What If I Don’t Have Buttermilk?
No problem! If you’re out of buttermilk, you can make a substitute by mixing 2 cups of milk with 2 tablespoons of vinegar or lemon juice. Let it sit for about 5-10 minutes, and it’s ready to use!
Can I Make This Recipe Ahead of Time?
Definitely! You can marinate the chicken overnight for great flavor. You can also coat the chicken and keep it in the fridge until you’re ready to bake it, but try to bake it within 24 hours for the best texture.
How Should I Store Leftover Chicken?
Store any leftovers in an airtight container in the fridge for up to 3 days. To reheat, pop them back in the oven at 350°F (175°C) for about 15-20 minutes to help regain some of the crunch!