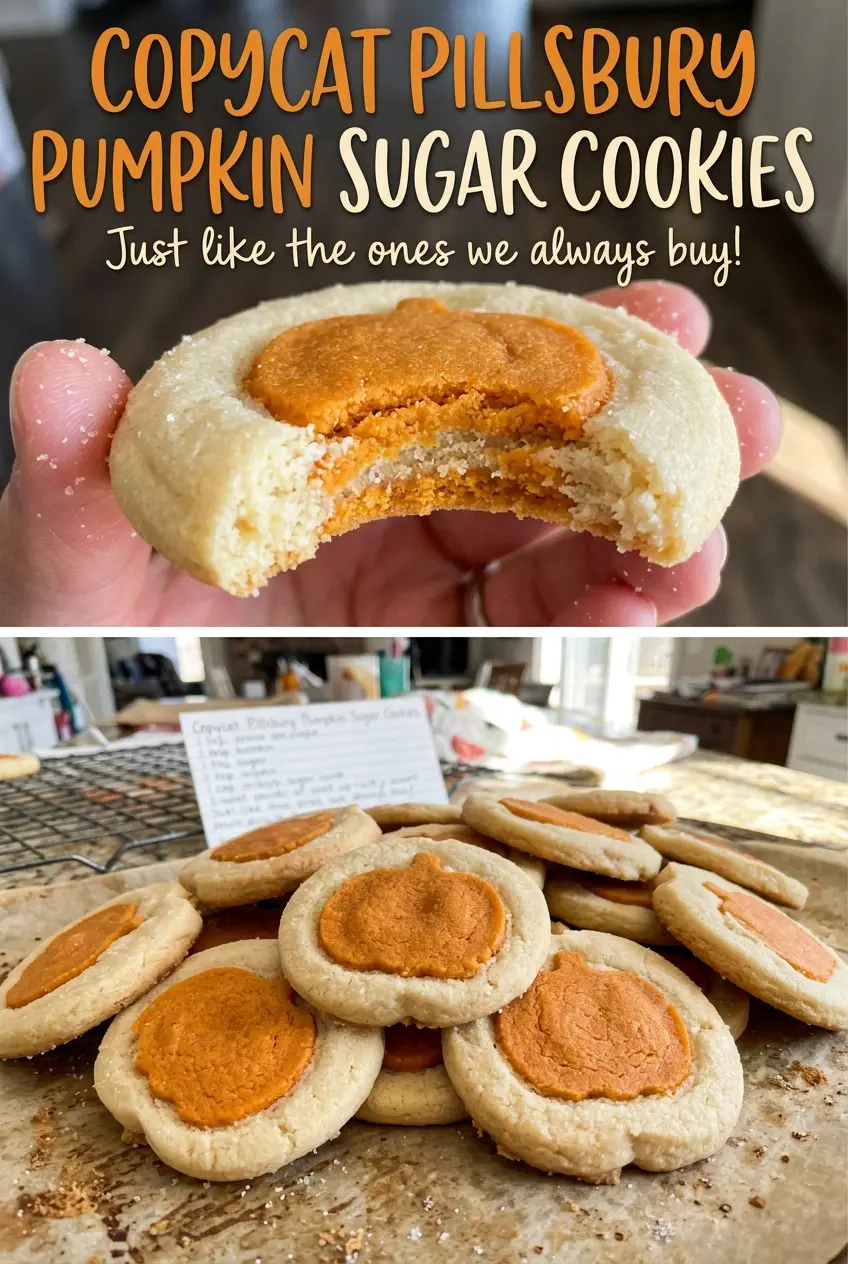
The first slice tells you whether the pumpkin is going to look like a pumpkin: a neat orange center with a little green stem, or a shape that’s wandered off to one side. This dough is built into a log before it ever reaches the oven, so the design shows up when you cut the chilled dough into rounds. These Copycat Pillsbury Pumpkin Sugar Cookies are vanilla sugar cookies with that familiar orange-and-green pumpkin look, not pumpkin-spice cookies.
I make the orange center and green stem first, then wrap them in plain dough and chill the whole log until it’s firm. That order gives the colored dough time to hold its shape before the outer layer goes on. Keep the seams pinched closed and smooth the log gently rather than squeezing it; the cookies will show every uneven spot once they’re sliced. The finished rounds have crisp edges, tender centers, and a clear little pumpkin design.
Kitchen Note
Let the baking sheet cool completely before you reuse it. A warm sheet starts softening the next set of slices before they’ve had a chance to bake evenly.
Save these Copycat Pillsbury Pumpkin Sugar Cookies for a crisp-edged slice-and-bake treat with a bright pumpkin design in every round.
Why the Pumpkin Has to Be Built as a Log Before You Slice It
A pumpkin cutter can stamp a silhouette into a flat cookie, but these cookies get their design from the dough itself. The orange portion becomes the center of each round, while a narrow piece of green dough sits along the top of that orange log as the stem. The plain dough wraps around the outside, so every slice reveals the same layered picture.
That construction also explains why the dough needs two chills. The short first chill firms the shaped pumpkin before it’s wrapped; the longer chill firms the complete log so the outer dough and colored center cut together instead of smearing. If the first chill gets skipped, the stem is easier to press out of place while wrapping. If you rush the second, the log can flatten or compress under the knife. A firm, evenly shaped log is what gives these sugar cookies their recognizable look, not a special cutter or a decoration added after baking.
The color is only visual. There’s no pumpkin puree or pumpkin spice in the ingredient list, which keeps the dough firm enough to shape and slice cleanly. Think classic vanilla sugar cookie with a pumpkin-shaped center, rather than a spiced pumpkin cookie.
Why Gel Color Matters More Than the Shade You Choose
- Butter — Softened butter creams smoothly with the sugar and gives the cookies their tender texture. Everyday unsalted butter works well; there’s no need to buy a specialty brand. A direct dairy-free swap can change how the dough firms and bakes, so the gluten-free option below keeps the butter intact.
- Granulated sugar — Its fine, dry texture works with the butter to make a cookie that holds its shape. Brown sugar brings extra moisture and a deeper flavor, so it isn’t a like-for-like replacement here.
- Egg and vanilla — The egg binds the dough, and vanilla gives the plain portions their familiar sugar-cookie flavor. Use a fresh egg and whichever vanilla extract you normally bake with; the more expensive bottle isn’t necessary. I wouldn’t swap out the egg in a dough that needs to hold a sculpted center and a clean outer wrap.
- All-purpose flour and baking powder — All-purpose flour gives the dough enough structure to form the pumpkin and wrap it without turning crumbly. A cup-for-cup gluten-free baking blend that includes xanthan gum is the most practical flour alternative; the dough can be more delicate, so handle it gently. Baking powder provides the recipe’s small amount of lift without making the rounds puff out of shape.
- Gel food coloring — Gel coloring is concentrated, so it colors the dough without adding much liquid. A budget gel works as well as a premium one for this design. Liquid coloring is less concentrated and can soften the dough before the orange and green shades are strong enough.
The Chilling Sequence That Keeps the Pumpkin Center in Place
Cream the Butter Before the Flour Goes In
Beat the softened butter and granulated sugar on medium for 2 minutes, until the mixture looks creamy. Beat in the egg and vanilla, scraping down the bowl so no streaks of butter stay tucked along the sides. Whisk the flour, baking powder, and salt in a separate bowl, then add that mixture on low. Stop as soon as no dry flour remains; beating longer can make the finished cookies tougher.
Shape the Colored Pumpkin Center
Divide the dough and set aside about one-third for the orange portion. Knead the orange gel color into that dough until the color is even, then knead the green coloring into 1 tablespoon of the remaining dough. Shape the orange dough into an 8-inch-long log about 1 1/2 inches wide and tall, press shallow grooves lengthwise, and place the green dough along the top as the stem. Chill this shaped center for 20 minutes so it’s firm enough to handle during wrapping.
Wrap, Seal, and Firm the Log
Flatten the remaining plain dough between sheets of parchment into a broad slab about 1/2 inch thick and large enough to wrap around the pumpkin. Cover the ends, pinch the seams closed, and smooth the outside gently into an even log. Don’t squeeze hard enough to flatten the orange shape underneath. Refrigerate the wrapped log for at least 1 hour, until firm; the center and outer layer need to feel solid together before slicing.
Slice Thin Rounds and Bake One Batch at a Time
Heat the oven to 350°F and line a large baking sheet with parchment paper. Slice the chilled log into 1/4-inch rounds and arrange them about 1 inch apart, keeping the rest of the log refrigerated between batches. Bake one batch at a time for 10–12 minutes, until the edges are set and the bottoms are just beginning to turn golden. Cool the cookies on the sheet for 5 minutes, then move them to a wire rack to cool completely.
Three Shape Changes That Keep the Dough’s Structure Intact
Make a gluten-free batch
Replace the all-purpose flour with the cup-for-cup amount of a gluten-free baking blend that includes xanthan gum. The dough may feel more fragile as you flatten and wrap it, so work between parchment sheets and keep the log well chilled. The cookies will still have the orange-and-green center, though the texture can be a little less tender than the original.
Turn the design into orange rounds
Leave out the green gel and stem, keeping the orange center and plain outer dough. You’ll still get a bright orange middle in each slice, but without the pumpkin silhouette. This is a simple way to keep the slice-and-bake look when you’d rather skip the small stem detail.
Bake classic vanilla rounds
Skip both food colors and the pumpkin shaping, then form the plain dough into a log, wrap it, and chill it until firm before slicing. You’ll lose the colored center but keep the buttery vanilla-cookie flavor and convenient slice-and-bake format. This is the simplest option if you want the dough’s flavor without the extra shaping.
Storage and Reheating
- Refrigerator: Refrigeration isn’t needed for baked cookies and can make them lose their soft texture. Keep them airtight at room temperature for about 5 days.
- Freezer: Freeze completely cooled cookies in an airtight container with parchment between layers for up to 2 months. Thaw them at room temperature while covered.
- Reheating: These cookies don’t need reheating; thaw frozen cookies at room temperature instead. Warming them can soften the edges and make the design less crisp.
Questions I Get Asked About These Pumpkin-Shaped Cookies
Copycat Pillsbury Pumpkin Sugar Cookies
Ingredients
Equipment
Method
- In a large bowl, beat the butter and sugar with an electric mixer on medium speed for 2 minutes, until creamy.
- Beat in the egg and vanilla until combined, scraping down the bowl as needed.
- In a medium bowl, whisk together the flour, baking powder, and salt.
- Add the flour mixture to the butter mixture and mix on low just until no dry flour remains.
- Divide the dough, setting aside about one-third.
- Knead the orange coloring into the portion set aside.
- Knead the green coloring into 1 tablespoon of the remaining dough.
- Shape the orange dough into an 8-inch-long log about 1 1/2 inches wide and tall.
- Press shallow lengthwise grooves into the orange log.
- Press the green dough along the top as a stem, then chill for 20 minutes.
- Flatten the remaining plain dough between sheets of parchment into a broad slab about 1/2 inch thick, large enough to wrap the log.
- Wrap the plain dough around the pumpkin, cover the ends, and pinch the seams closed.
- Gently smooth the dough into an even log and refrigerate for at least 1 hour, until firm.
- Heat the oven to 350°F and line a large baking sheet with parchment paper.
- Slice the log into 1/4-inch rounds and arrange them about 1 inch apart on the baking sheet.
- Keep the remaining log refrigerated between batches.
- Bake one batch at a time for 10–12 minutes, until the edges are set and the bottoms are just beginning to turn golden.
- Let the baking sheet cool completely before reusing it.
- Cool the cookies on the baking sheet for 5 minutes.
- Transfer the cookies to a wire rack to cool completely.


